Posts

How to sort, store and POP weighted items using ZADD and ZPOPMIN|MAX in redis?

Image
There is often a need to sort items(strings, integers etc.) on the basis of weight attached along with each one of them. Though a SORT by WEIGHT feature is available in redis, as found at https://redis.io/commands/sort , another way to dynamically sort and store weighted items is explained here. For example consider the following items(elements) along with their weights:- Set name = ordered_array In order to get these elements in the order of their weights, add them to the redis data structure using ZADD and pop each element one by one using ZPOPMIN (or ZPOPMAX if needed in opposite order of weights). A running redis-server is required for this code to work. For installation instructions on redis refer to https://foolsvilla.blogspot.com/2020/03/installing-redis-508-on-linux-ubuntu.html . The hiredis library is installed along with redis. Following C code is used along with this hiredis library to access redis data structure. The code adds elements with weights to redis and

How to install from redis-5.0.8.tar.gz on linux (Ubuntu)?

Image
Redis data structure is light weight, in-memory and easy to use. This can be very useful, if you have multiple threads that need to share data. I have successfully used redis on raspibian OS(running on Raspberry Pi B+) and Ubuntu 18.04.4 LTS(on Laptop). I had code written in C. Using hiredis, I was able to interact with redis. Here are the steps that were followed to get redis-5.0.8 installed on Ubuntu:- 1)   Download the latest stable version of redis from https://redis.io/download . Extract the redis-5.0.8.tar.gz folder. Navigate inside the extracted folder named redis-5.0.8 . 2)   Open terminal window inside this folder. Run following in terminal $> sudo -s   #enter the password $> make   #this will take some time. May be a minute or two $> make install       $> nano redis.conf    #now the configuration file is opened to be edited for adjusting to your requirements This file has good explanation and comments for each line used in configuration. You may do the configu

Could not open lock file /var/lib/dpkg/lock-frontend - open (13: Permission denied). Error while trying to use apt package manager in ubuntu

Error E: Could not open lock file /var/lib/dpkg/lock-frontend - open (13: Permission denied) E: Unable to acquire the dpkg frontend lock (/var/lib/dpkg/lock-frontend), are you root? Solution dpkg is the package manager for debian systems. When you try to use apt(Advanced Packaging Tool) for tasks like "apt install xxx" or "apt upgrade xxx" or "apt update xxx" etc. ("xxx" here stands for the package name). I have observed the above error in two scenarios. 1) Another package operation using apt is in progress, may be from a different terminal. In this case you have to wait for the already executing package operation to complete and then then re-execute the apt command. Else if you want to kill the running process of dpkg, prior to executing the present command, you may do so with following $> sudo killall dpkg $> sudo rm /var/lib/dpkg/lock 2) You need root privileges. This question is asked along with the error its

SINGLE PACKET AUTHORIZATION (PORT KNOCKING) EXAMPLE SIMULATION IN MININET

Image
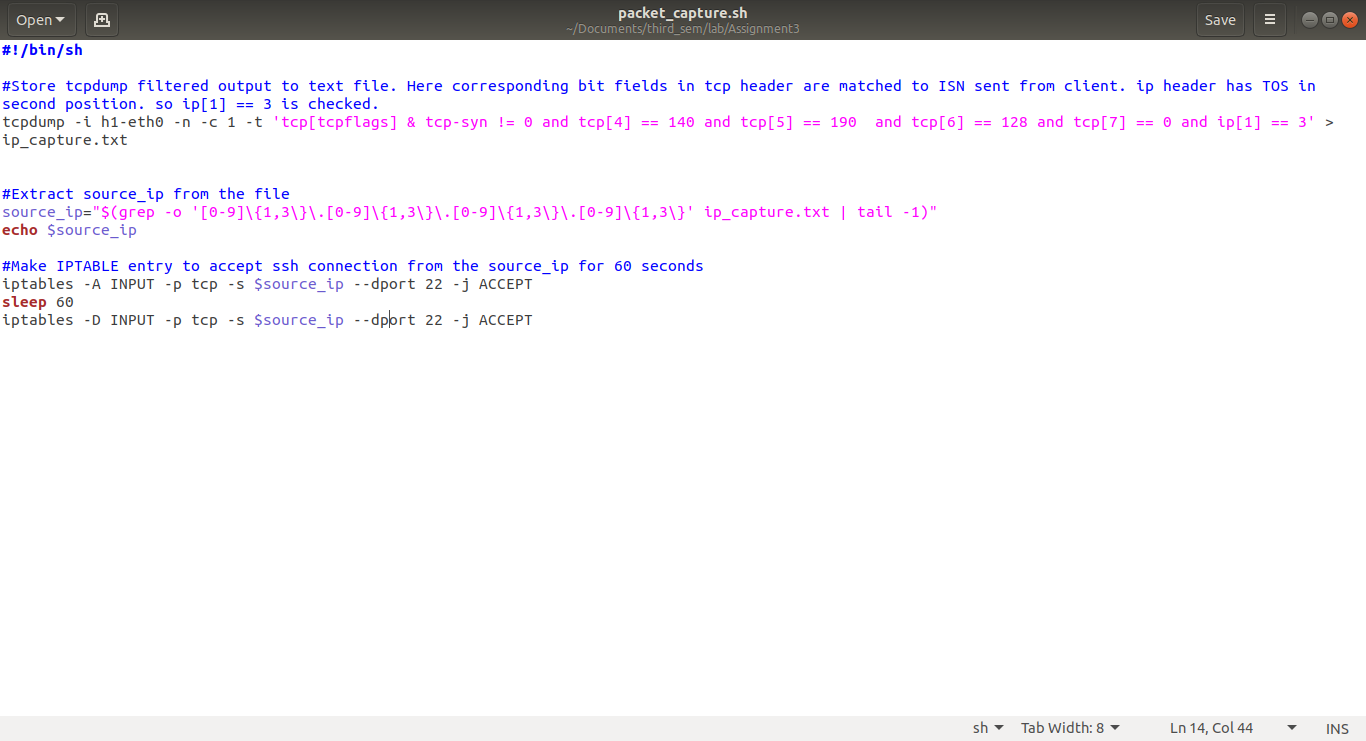
SPA is one method of port knocking used to dynamically modify firewall rules and allow access to specific port of a remote system. Details on this may be read from https://en.wikipedia.org/wiki/Port_knocking . We will be implementing a network with SPA authorization for SSH. Here the system is configured to allow access to SSH port (number 22) only after receiving an authorization packet from a remote system. The authorization packet used is TCP SYN packet with ISN(2361294848) and TOS(3). Upon receipt of this packet the access to SSH port is enabled for 60 seconds. SSH connection is allowed to the system for this duration window only. If remote system establises a connection using ssh within this duration, then the connection persists. Here, two methods to allow SPA are discussed. First one allows port opening for a particular IP address and second method uses the MAC address of requesting system to authenticate opening of port. The second method is useful when DHCP is configured to

How to set static IP address for Raspberry pi in headless setup?

Image
For a headless raspberry pi device, which was configured for dhcp service in the network, if the router has become unavailable, the device IP assignment is not done in the network. In such scenario, the device will not be accessible in the network as no IP address is available to it.  Using ssh, the raspberry pi device can be accessed from remote system. This require IP address of the raspberry pi device to be know beforehand. For raspberry pi running Raspbian OS from an SD card, there is a way to directly configure the IP address as static. 1) Remove the SD card and load it into an SD card reader. Now plug the card reader to laptop or reader slot attached with the system. Now two partitions will be mounted on the system /boot and /rootfs. To enable ssh simply create an empty file named ssh in the /boot partition  $ cd /boot  $ touch ssh 2) Navigate to "etc" folder in rootfs partition. In ubuntu terminal  $ cd /rootfs/etc 3) Edit the file dhcpcd.conf

Login to D-Link switch

D-Link switch by default (or on reboot/ reset) has following credentials. Following has been verified on model DGS 1210-10P:- 1) IP Address = 10.90.90.90/8 2) Username = admin 3) Password = admin Pressing the reset pin on switch after disconnecting from router resets it's IP to default value. This takes about 3 minutes. Connect the switch to laptop using ethernet cable. Inorder to connect and login to the switch you need to set the laptops IP within network range of switch. Set static IP on wired network for laptop to 10.90.90.10/8.  (In ubuntu go to Network > Wired > IPv4. Select Manual option and add following Address = 10.90.90.10 Netmask = 8 Click Apply. ) Now go to browser. Type 10.90.90.90 at url field. Prompt to login for switch appears. Else open terminal in ubuntu. Type $ sudo telnet 10.90.90.90 Prompt to login with username and password appears. Settings can be now customised refering to the switch manual.

Send and Capture icmp packets with type&code using hping

Here TCL script files are run at terminals of different hosts setup in a mininet environment. The code at one host generates packets of different ICMP types and codes (Please refer to different types and codes associated with ICMP packets at https://www.iana.org/assignments/icmp-parameters/icmp-parameters.xhtml ). The code run at the second host captures these packets and extract the type and code fields. Here hping3, TCL and mininet are installed on Ubuntu system for the experiment. I)    SCRIPTS Script for creating mininet hosts ~~~~~~~~~~~~~~~~~~~~ Save the following in net.py from mininet.topo import Topo class MyTopo( Topo ):     def __init__( self ):         Topo.__init__( self )         # Add hosts and switches         left_host = self.addHost( 'h0' )         right_host = self.addHost( 'h1' )         centre_switch = self.addSwitch( 's0' )         # Add links         self.addLink( left_host, centre_switch )         self.addLink( right_

MAC address to IP address conversion using shell script

Find IP address of a system given its MAC address from linux(Ubuntu) RARP is reverse ARP used to get IP address from MAC of a device. Here we use ARP itself to do the reverse. Given the MAC address of a system, the following method can be used to get its IP address in the network. 1) Save the following into a file called rarp.sh #!/bin/sh #Does arp scan. Search for the line containing MAC address in the scan result. #Match the regular expression pattern for ip address in this line and print the result. arp -a | grep $1  | grep -E -o "([0-9]{1,3}[\.]){3}[0-9]{1,3}" 2) Open a terminal and navigate to the folder containing this file. Make the file executable by typing following in terminal chmod 777 rarp.sh 3) Pass the MAC address as argument to the file from terminal. If 9h:5e:42:b1:e4:f0 is the MAC address for which IP has to be found, then type in terminal ./rarp.sh 9h:5e:42:b1:e4:f0 This prints the IP address related to this MAC address

Mirror android mobile screen on laptop

There are many situations that leads to such a requirement. If the internet connectivity at home is of less speed and you have access to a higher bandwidth wifi internet at the place of work. If you want to search and download favourite series on mobile phone and later watch the same on laptop at home. Direct approach ~~~~~~~~~~~~ Just mirror the mobile phone on laptop screen. The downloaded videos on mobile can be played and accessed from laptop after screen mirroring. This will give provision to control (play, pause, navigate etc.) the same from laptop. Tested platform ~~~~~~~~~~~~ Phone with android OS Laptop with ubuntu OS To do ~~~~ 1. Get SCRCPY(There are enough resources available in internet to help in installation of SCRCPY on windows/linux/mac OS). For ubuntu, type in terminal sudo apt-get install scrcpy 2.    After successful installation, connect android mobile phone using USB to laptop in FILE TRANSFER mode. Now the android USB DEBUG

Exception: Please shut down the controller which is running on port 6653: Mininet

For following error: """ *** Creating network *** Adding controller -------------------------------------------------------------------------------- Caught exception. Cleaning up... Exception: Please shut down the controller which is running on port 6653: Active Internet connections (servers and established) tcp        0      0 0.0.0.0:6653            0.0.0.0:*               LISTEN      1828/ovs-testcontro tcp        0      0 127.0.0.1:42042         127.0.0.1:6653          TIME_WAIT   -                  -------------------------------------------------------------------------------- *** Removing excess controllers/ofprotocols/ofdatapaths/pings/noxes killall controller ofprotocol ofdatapath ping nox_core lt-nox_core ovs-openflowd ovs-controller udpbwtest mnexec ivs 2> /dev/null killall -9 controller ofprotocol ofdatapath ping nox_core lt-nox_core ovs-openflowd ovs-controller udpbwtest mnexec ivs 2> /dev/null pkill -9 -f "sudo m